


All standard text editing capabilities are available in the input pane of a SQL Worksheet. You can edit text in the input pane using the mouse, keyboard functions, and the Edit menu. In addition, you can select text from the output pane and paste it into the input pane.
When you execute a command, the command and its output appear in the output pane. However, if you set the parameter ECHO to off, only the output of the command is displayed. For information about setting Server Manager parameters, see the SET command in Appendix A, "Server Manager Command Reference."
The following figure illustrates executing a SQL statement in a worksheet.
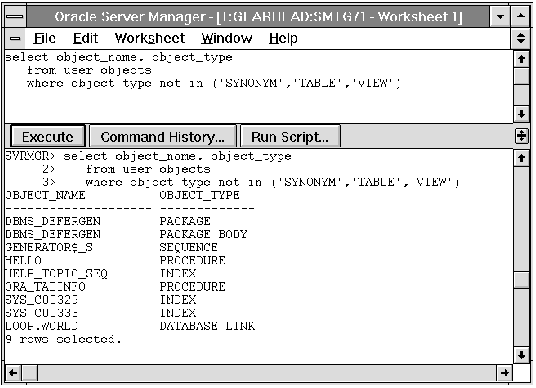 Figure 9 - 3. Executing a Command in the SQL Worksheet
After you execute a command, the command remains in the input pane, but is selected, as shown in Figure 9 - 3. You can then type in the next command, and it replaces the previous command. You do not need to delete the previous command unless you are running Server Manager under Windows.
Additional Information: For information about the standard file selection dialog box for your system, see your operating system-specific documentation.
If you execute the CONNECT command from the input pane without any arguments, the Connect dialog box appears. You can use the Connect dialog box to specify a new connection for that worksheet. For a description of the Connect dialog box, see Chapter 1, "Overview of Server Manager." You can also specify the connection using arguments in the CONNECT command. For a description of the CONNECT command and its syntax, see Appendix A, "Server Manager Command Reference."
Note: The SQL Worksheet also contains the File pull-down menu, which is described![[*]](jump.gif) . When you choose Connect from the File menu, the Connect dialog box also appears. However, when you choose Connect from the File menu, you are not changing your worksheet connection. In this case, the connection you are specifying is for a new Administration window.
. When you choose Connect from the File menu, the Connect dialog box also appears. However, when you choose Connect from the File menu, you are not changing your worksheet connection. In this case, the connection you are specifying is for a new Administration window.
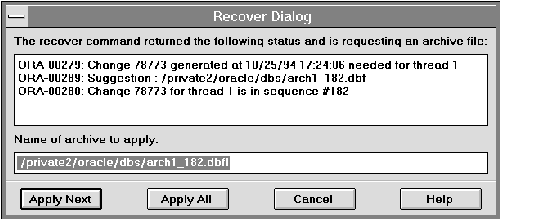 Figure 9 - 4. Recovery Dialog Box
From the Recovery dialog box, you can apply the next log file, apply all the log files, or cancel recovery. You can specify the name of the log file to apply or apply the default. For more information about the Recovery dialog box, see Chapter 6, "Backing Up and Recovering the Database."